This chapter contains the following topics:
Before getting started, ensure that the Payroll software is installed on your computer. Refer to the PBS Administration documentation to install the Payroll module before proceeding.
You may want to familiarize yourself with the main features of this module by reading the Understanding Payroll chapter in this documentation.
You should consult with your accountant before using the Passport Business Solutions software. Your accountant should be familiar with your accounting software, and can advise you on converting from your existing Payroll system.
Before you use the Payroll module you enter data about your current payroll.
There are six different data groups, files in standard vision or tables in SQL, that you enter (if necessary, refer to the Data Organization section in the Understanding Payroll chapter), before you use the module on a regular basis. A brief explanation of those files and tables follows.
This data contains basic information about your company (or each of your companies, if you are using multiple companies). Here you specify information such as your company’s name and address and whether or not you use sub accounts and cost centers.
The number and description (from your G/L Chart of Accounts) for each G/L account used in Payroll activity must be entered in here. This includes your wage, tax, and deduction accounts and any other cash (checking) accounts that you use in payroll. If you are using Cost centers or Sub accounts you must enter these before you can enter the Valid G/L accounts.
This contains a list of all your cash accounts, including those used by the PBS Accounts Receivable, Accounts Payable, Check Reconciliation, and Payroll. These accounts must also exist in Valid G/L Accounts and should be in the General Ledger Chart of accounts.
This contains controls that defines how you use your company payroll. This information changes or controls some of the features of the Payroll programs. For example, part of control information determines whether you want to manually distribute wages to G/L accounts when you make payroll entries.
This allows you to maintain your own tax tables for federal, state, and local (if any) taxes and related payments. The functions for maintaining these tables are easy to use, but do require that you supply the correct numbers. You may want to get help from your accountant in setting up your tax tables.
With deduction codes, you define all the voluntary deductions and miscellaneous earnings (other than salary and wages) that you use. You assign a code to each deduction or earning. For example, you might assign the code MI to your medical insurance deduction, or XB for a Christmas bonus (a miscellaneous earning). You also enter the Workers’ Compensation classification codes.
This contains a record for each of your employees. Each employee record contains information such as the employee’s name, address, social security number, salary or hourly rate, number of withholding exemptions, recurring deductions, year-to-date earnings and taxes withheld, and stores other YTD information.
In order to have a working system you must enter data in PBS and Payroll. Then you may do the steps to go from setup mode to regular mode. After that you are ready to start using Payroll.
Follow the steps below to set up the Passport Business Solutions Payroll and enter employees:
|
Step |
Description |
|
1 |
Study the General Features of Passport Business Solutions in the System Userdocumentation. |
|
2 |
Start Payroll according to the instructions in the Using Payroll chapter. |
|
3 |
The company controls are set up for you as part of the installation procedure. Use Company information to modify company data to be appropriate for your company (refer to the Company Information chapter in the PBS Administration documentation). |
|
4 |
If you are using cost centers or sub accounts enter them in the CTL menu selection Cost centers / Sub accounts. Enter your valid G/L accounts, using Valid G/L accounts. Valid G/L Accounts is used by Payroll to ensure that every G/L account entered into the system is a valid account (refer to the Valid G/L Accounts chapter of the System User documentation). If you are also using General Ledger, you can enter your Chart of Accounts first. There are two methods of setting up the Valid G/L accounts from the Chart of accounts: 1. Use Setup valid G/L accounts within G/L to transfer accounts to the Valid G/L Accounts. 2. In the G/L Control information, check the field Update Valid G/L accounts when adding /changing G/L accounts. When you add, change or delete an account using Chart of accounts, the Valid G/L account is added, changed or deleted at the same time. |
|
5 |
Enter your cash accounts, using Cash accounts under the CTL menu. The PBS software allows you to use an unlimited number of cash accounts. These must also have been entered in Valid G/L Accounts (refer to the Cash Accounts chapter of the System User documentation). |
|
6 |
Enter Payroll controls using Control information. The settings in Payroll Control information controls how Payroll is used by your company. For example, you specify whether or not you want your company name printed on paychecks, etc. Be sure to set the field PR is in setup mode field to checked or Y. The Go from Setup to Regular Mode section below explains how to go from setup mode to regular mode. |
|
7 |
Enter codes for deductions and earnings, using Deductions/Earnings. Deduction and earning codes define deductions and earnings that affect an employee’s wages. Codes for all possible employee deductions and earnings (except wages and withholding taxes) should be entered. Examples of deductions are insurance, charitable donations, and savings bonds, as well as 401(k) deductions. Earnings include entertainment allowances, travel subsidies, commissions, meals, tips, bonuses, etc. (refer to the Deductions/Earnings chapter). |
|
8 |
Enter the federal and appropriate state and city tax tables, using Tax tables. All companies require the federal tax code, and some companies may require tax codes for several states and cities (refer to the Tax Tables chapter). |
|
9 |
If you plan on using direct deposit or positive pay, read the Implement Positive Pay and Direct Deposit appendix in this documentation for a list of steps to set up these features. |
|
10 |
Enter each employee, using Employees (refer to the Employees chapter). |
|
Note |
Do not enter employee year-to-date totals on the last screen of Employees These totals must be set by entering and posting transactions as described in the next steps. |
|
Note |
There are three check types that you may use with Payroll. If you are printing checks, as opposed to generating direct deposit, you must order check stock in order to print pay checks. Call you forms provider for instructions and samples. Forms are available through Trainor Printing. If you are generating direct deposit you may print the pay information on plain paper or on forms paper intended for direct deposit. |
Follow the steps below to have your payroll system from setup mode to regular mode:
|
Step |
Description |
|
1 |
Verify that Payroll is in setup mode by selecting Control Information and then viewing the PR is in setup mode field. For the next two steps, it is critical that this field is checked (or set to Y in character mode), indicating that Payroll is in setup mode. |
|
2 |
For each employee, enter an adjustment transaction (using Adjustments) for each quarter that has already been processed for the calendar year. When entering the transactions, you see SETUP MODE at the top right of the screen. You will not be asked for G/L distributions for these transactions, because you are in setup mode and are entering information to initialize Payroll’s files, not for the purpose of creating distributions to the General Ledger. |
|
3 |
For each employee, enter an adjustment transaction (using Adjustments) for the current quarter that summarizes all payroll checks already cut for the employee in the current quarter, up to but not including the first payroll check that will actually be cut using the Passport Business Solutions Payroll. When entering the transactions, you see SETUP MODE at the top right of the screen. You are not asked for G/L distributions for these transactions, because you are in setup mode and are entering information to initialize Payroll’s files, not for the purpose of creating distributions to the General Ledger. |
|
4 |
Print an edit list for the adjustments, verify your data entry, and then post the adjustments. |
|
5 |
If you have set Allow protected changes to checked or Y in Company information, you can now set PR is in setup mode to unchecked or N using Control information. (Refer to the Overriding Protected Changes section in the Use of Function Keys, Tool Bar and Windows chapter of the System User documentation for a description of how to make protected changes). |
|
6 |
If you have set Allow protected changes ? to unchecked or N in Company information, you must first set this field to checked or Y and then set PR is in setup mode to unchecked or N in Control information. (Refer to the Overriding Protected Changes section in the Use of Function Keys, Tool Bar and Windows chapter of the System User documentation for a description of how to make protected changes). After you set PR is in setup mode to unchecked or N, go back to Company information and set Allow protected changes to unchecked or N, so that protected changes will not be allowed during your normal use of the software. |
If you want to print customized quarterly reports, enter quarterly report formats using Quarterly report formats.
|
Note |
Predefined quarterly report formats are available. Refer to the Quarterly Report Formats chapter in this documentation. |
Begin using the Passport Business Solutions Payroll module on a regular basis. From this point on, enter all payroll activity through this module. You may refer to section below and the Guide to Periodic Operations chapter.
When you have finished building your data as above, you are ready to use Payroll on a regular basis. The remaining chapters in this manual show you how to:
| • | Process payroll transactions and adjustments |
| • | Calculate payroll, print payroll checks or print direct deposit mailers |
| • | Print the various reports |
| • | Enter quarterly report formats |
| • | Define extended data fields for employer and employees |
| • | Enter electronic media formats |
| • | Close the calendar year |
| • | Print reports from disk |
The appendices contain material which is used only for particular states or which is referenced from within several different chapters.
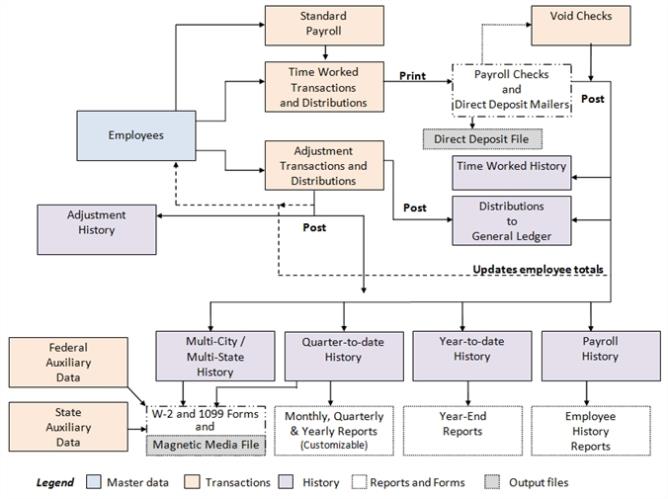
This chart illustrates the flow of data within the Payroll module.
Some lines are dotted because when they intersect with a solid line they do not interface.
Some of the data can come from other sources. For example, when entering a time transaction job data is tied to the Job Cost module when Job Cost is interfaced. When entering an employee, data may be needed from the tax table, deductions/earnings and direct deposit accounts.
If you will be reporting either state unemployment insurance information or state annual withholding information electronically, enter formats for these reports, using Magnetic media formats.
Prior to doing this, you should obtain the specifications for such reporting from your state taxing agency. Study these specifications to determine whether any additional employer or employee data is needed that is not already stored in the Payroll system.
Your state may require you to report whether an employee is an officer of the company.
Some states require that an employee’s name be reported in distinct segments of First name, Middle initial or name, and Last name. You may want to define these as additional fields for an employee.
The States of Pennsylvania and Illinois require reporting monthly.
A complete list of employer and employee fields available for magnetic media reporting is provided in the State Magnetic Media Report Fields appendix.
If you need to include additional data fields, define them as employer or employee extended fields, using Define extended fields, and then enter the data for them, using Control Information for extended employer fields and Employees for extended employee fields.
Once this is done, all the data fields you need for building your report formats are available for selection during entry of the report format.
If you have problems with this software module, contact your dealer or authorized consultant.
For the name and location of a Passport dealer or an authorized consultant near you, contact Passport Software Inc. at 1-800-969-7900.
If you wish to receive support directly from Passport, please call our End User Support Department at 1-800-969-7900
You can contact your own dealer for training; however, if your dealer does not offer training, call Passport at 1-800-969-7900.